Toon Shading and Contour Rendering

● Open 14-contour_01.ma
● Render the scene. A ramp shader is being used to give the vase a toon-shaded quality in the Maya Software renderer. Look at the Ramp attributes to see how this was done.
● Apply a new Blinn shader to the vase.
● In the blinn's shading group node (blinn1SG) go to mental ray : Contours and turn on Enable Contour Rendering.
● Set Relative Width to .5 and Color to Red
● Switch to the mental ray renderer and set Quality Presets to Preview
● In the Contours section of the features tab of render settings, turn on Enable Contour Rendering.
● In the Draw By Property Difference section, set Between Different Materials to On.
● Render
Try using Draw By Property Difference : Around Render Tesselation to evaluate settings in an approximation node, or to see how an object is tessellating. (Create and assign a NURBs surface approximation node to the vase and switch approximation presets to see the difference in the renderer).
Maya Toon Shading
- Accessed under the Toon menu (Rendering menu set)
- Uses a combination of ramp shaders (for fills) and Paint Effect strokes or offset meshes (for outlines)
- Uses the Maya Software renderer
- Can use mental ray or Maya Hardware render (requires additional steps)
- Open toon1.mb
- Switch to ShotCam
- Toon: Set Background Color: shotCam – set to sky blue
- Select the hill and choose Toon>Assign Fill Shader: Solid Color (assigns a Surface shader to the hill)
- Open the Attribute Editor for the surface shader. Change the color to grassy green.
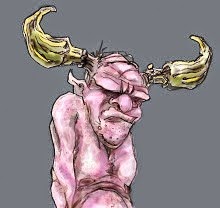
- Select the shroom on the right and Toon: Assign Fill Shader: Light Angle Two Tone (assigns a ramp shader)
- Attribute Editor: Change colors to dark purple and light purple
- Select the shroom on the left and Toon: Assign Fill Shader: Shaded Brightness Two Tone
- Attribute Editor: Change colors to dark orange and yellow
- Select the middle shroom and Toon: Assign Fill Shader: Shaded Brightness Three Tone
- Try the other fill presets (Dark Profile, Rim Light, Circle Highlight) on the shrooms.
- Apply fill shaders to the eyeballs and eyelids and teeth.
Keep going, or open toon2.mb.
- Select the right shroom
- Toon: Assign Outline: Add New Toon Outline
- Attribute Editor: Line Width 0.033
- Tumble around to see how outline updates. It is actually a paint effects stroke that updates according to camera angle.
4 Types of Toon Lines:
- profile – define outside of an object
- border – open edge of geometry or borders between shaders
- intersection – where two objects that have the same toon line node applies intersect
- crease – hard edges on polygon objects (not view dependent)
Border lines:
- Select the two eyelids for the right shroom
- Toon: Assign Outline: Add New Toon Outline
- Set width to 0.033
Intersection lines:
- Select the middle shroom and the hill
- Toon: Assign Outline: Add New Toon Outline
- Set Profile Lines to off
- set Border Lines to off
- uncheck Crease Lines
- check the Intersection Lines box to turn intersection lines on
Toon Shading Part 2
Open toon3.mb
A single toon line has been applied to all objects but the pupils (because toon lines can only be applied to meshes, not curves. However, Paint Effects strokes can be applied to curves)
- Windows: General Editors: Visor: Paint Effects Tab: Toon folder: Smooth brush
- Edit: Select All by Type: NURBS Curves
- Paint Effects: Curve Utilities: Attach Brush to Curves
- In the Outliner, select the newly created strokes and choose Paint Effects: Share One Brush
- Attribute Editor: Global Scale for the brush stroke to 0.165
- Render
- Select pfxToon1 node and look under Profile Lines attributes.
- Try using Profile Width Modulation to vary the width of the Profile lines depending on their curvature, causing the render to look more like a loose sketch than CG.
- Under Common Toon Attributes, set Lighting Based Width to 1.0 (makes line thin where light hits)
- Return Lighting Based Width and Profile Width Modulation to 0.
- Next to the field for Line Width Map, click the Texture button and choose a Noise texture. This creates a “scribble” line. Adjust settings in the Alpha Gain section in the Color Balance tab of this texture to increase or decrease thickness of lines. Animate the texture to create “nervous line” animation.
Applying Paint Effects Strokes to Toon Outlines
- In the Visor, open the Toon folder, and select brokenWiggle.mel
- Select the pfxToon1 node
- Toon: Assign Paint Effects Brushes to Toon Lines
- Render. Try other types in the Toon folder.
Layering toon lines.
- Assign the doodle line.
- Select the geometry for the three mushroom and the hill and choose Toon: Assign Outline: Add New Toon Outline
- Select the new pfxToon2 node in the Outliner..
- Visor: select brokenGlopLine
- Toon: Assign Paint Effects Brush to Toon Lines
- Attribute Ed. for brokenLineGlop1: Brush Type - Smear
- Render. Notice how the doodle line and edges of fill are still visible but have been smeared by the broken glop line.
See also Toon: Get Toon Example

No comments:
Post a Comment